Lunch/Dinner
Cheese-less “Cheese” Lasagne


During the winter time, it can be a bit hard to make smart food choices because of all the delicious Starbucks drinks, hot chocolates, and warm Mac n Cheese. The recipe below embodies all things winter but at the same time includes some healthy elements too. I present Cheese-less, gluten-free, “cheese” Lasagne. Although this recipe has some healthier components, I promise that this recipe tastes exactly like real Lasagne, but it is better for you and is beneficial to those with food allergies. This cheese sauce recipe is credited to Youtuber, Ingrid Nilsen.
Serves: 3-4 people
Ingredients:
- 1 box brown rice lasagne noodles (or regular lasagne noodles)
- 1 1/2 jars tomato sauce
- 1 garlic clove
- 1 1/2 cups raw cashews (soaked in water for 30 minutes)
- 1/4 cup nutritional yeast (found in select health food stores; this gives the cheesy taste)
- 3/4 cup water
- 3 tablespoons fresh lemon juice
- 1 teaspoon Dijon or regular yellow mustard
- 1/2 teaspoon chili powder (optional)
- pinch of Cayenne powder (optional)
- pinch of turmeric
Directions:
- Spray an 8 inch pan with baking spray.
- In a food processor, combine garlic, cashews, nutritional yeast, water, lemon juice, mustard, chili powder, cayenne powder, and turmeric. Turn the food processor to the highest setting for about 2-5 minutes. Scrape down the sides of the bowl insert. If the sauce is too thick, add a bit of water or almond milk to smoothen it out. Set aside.
- Cook noodles as directed on the package. Then line the bottom of the pan with noodles. Spread 1/3 of the “cheese” sauce onto the noodles. Top with some tomato sauce, covering all the “cheese.” Repeat this step another 2 times or until all the “cheese sauce” and tomato sauce are used up.
- If the noodles were not baked beforehand, add some water to the pan to moisten the noodles so they can cook. Bake in a 350 degree oven for about 25 min (if the noodles were precooked) or 35-50 minutes if the noodles are just beginning to cook. **If your pasta seems to become dry on top, cover the noodles with more tomato sauce and cover the pan in aluminum foil.
- Serve warm right away on a cold day or refrigerate for later and rewarm the dish when ready to eat.
**I recommend doubling the entire recipe if this dish is being served for a family of four for dinner.
**You can also add any vegetables of your choice if you would like.
***No other yeast can be substituted for nutritional yeast!
Desserts
Molten Chocolate Lava Cake
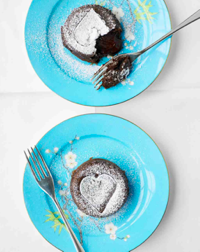 Since the winter is approaching and will soon be gone (here in sunny Florida), it is only appropriate that we welcome Molten Chocolate Lava cakes into our “cold” month. These small cakes are easy to prepare and taste restaurant-worthy. Within each cake lies a gooey center, surrounded by an outer layer of moist chocolate cake. Don’t be intimidated by its name; Lava cake takes about 10 minutes to prepare and is SO worth it!
Serves: 2
Ingredients:
- 2 tablespoons margarine, butter, or coconut oil
- 1/3 cup confectionary sugar
- 2 ounces chocolate chips
- 1 large egg
- 1 large egg yolk
- 1 teaspoon expresso powder (optional)
- pinch salt
- 3 tablespoons all-purpose flour or Gluten Free All-Purpose Flour
Directions:
- Preheat oven to 400 degrees.
- Spray two 6-ounce ramekins with baking or cooking spray.
- Place margarine and chocolate in a microwave in 20 second increments, stirring each time until melted. Let cool for 3 minutes.
- In a medium bowl, whisk egg, egg yolk, confectionary sugar, espresso powder, and salt. Add in chocolate mixture and whisk to combine.
- Divide batter evenly into the two greased ramekins.
- Bake for 10-12 minutes, until the toothpick comes out wet when stuck into the center of the cake but dry when stuck into the sides of the cake.
- Cool ramekins for 10 minutes on wire rack (or towel).
- Run a knife around the inside of the ramekins to loosen the cake.
- Invert the cake onto a serving plate, dust with powdered sugar and serve immediately.
***This recipe is from Martha Stewart. Although the picture above is from Martha Stewart’s website, I have made this recipe many times and the cakes come out looking just like the picture above.
<3 – Dalya Rubin